Tuesday, 29 October 2013

My Journey with the Elizabethans- Modern Elizabethan Style Inspiration


Many Elizabethan hairstyles were very intricate with lots of details.  These details included plaits, buns, braids with lots of jewels, gems and ribbons to enhance the beauty of the style.


I love this style because of the detailed fishtail plait, placing plaits at the side of the head is very common nowadays and creates quite a chic, soft look.  So although like the Elizabethan style there is lots of detail, it is created in a much softer way.  The volume at the front portrays more of an Elizabethan feel, whereas the colour of the hair represents the idea that today, we aren't afraid to experiment with lots of different colours to achieve our desired effect/look.


I really admire the use of twists for this style, the plait isn't as intricate as the plait in my previous image, however it replicates the curliness that the Elizabethan's used for many of their styles, as well as the twists that they used to place at the front of the head. The style creates a nice rounded shape at the front of the head, so although a very contemporary style, it still holds Elizabethan ideals.  Small bits of ribbon have been used to secure the hair in place, which was also very common during the Elizabethan Era, to add some extra detail. 


This low bun, a very modern style is made fairly Elizabethan through the use of the grid like pattern and pearls over the bun.  I find this style really interesting, as it has lots of sleek, contemporary elements, but the decoration adds an Elizabethan touch.  The pattern reminds me of ribbon, a prop that the Elizabethans loved to use. 

My Journey with the Elizabethans- Contemporary Hair Designs with Elizabethan Influences


I collected these images as inspiration for my New Elizabethan project, to me although some of these images may look very current and modernised, they hold many connotations of the Elizabethan Era, and tradition ideals.  


The model's hair in this photo has been styled in a very Elizabethan way, with many modern twists.  The dark red hair is reflective of the hair colour that was very much desired during the Elizabethan Era.  The hair is all very curly, curled in different styles, some of the curls are very loose, others look like they have almost been crimped, which adds a bit of a contemporary feel.  There is a lot of volume at the front of the head, which was very common also.  Instead of a crown as a headpiece, a small flower has been used with pearls resting over her forehead, this is a modern twist on the extravagant headpieces that saw on the Elizabethan women. 


This is my favourite style out of all three, I love the volume at the front, with the small ponytail that falls down the side, again the height at the front of the head was extremely common during the Elizabethan times.  The hair is a lot less curly than what was known back then, however straight hair is a common desire today, so slightly reflects the modern day. 

The hair is a deep mahogany red, a bit darker than what was common back then, if I was to create a contemporary version of this image, I would make the hair a more vibrant red/orange and maybe incorporate some plaits and twists, or maybe a small headpiece or jewel at the front of the head. 


This is definitely a contemporary take on a typical Elizabethan hairstyle.  The most prominent modern factor here would have to be the colour of the hair, a mixture of blonde and browns create a different portrayal of the usual red Elizabethan hair colour.  There is a lot of curly texture with this style, and a lot of volume.  The crown at the side of the head definitely adds a bit of attitude to the look, typical of Beyonce and many celebrities in todays world.  I really like the ringlets down the side of the face, with creates a softer feel, different to the harsh hairlines back then. 

Monday, 28 October 2013

The Hair Studio- Practical Week 3/4- Fishtail Plaits


This week, we were also taught how to create a Fishtail Plait, this is an alternative to the French Plait and can look very chic and modern.  You can create a neat up-do with this style, as well as a messy look, with lots of natural texture. Here are the steps to create the perfect Fishtail Plait:

1.  Start off the styling with brushing through the hair, this will remove any tangles and allow you to create your fishtail plait much more effectively.  Put the hair into a ponytail with a clear elastic, at the back of the head or the side will do.

2.  Split the ponytail into two equal sections, take a small piece of hair from the first section and add it to the second. You then take a piece of hair from the second side, and pass it back to the first. Always make sure you are taking hair from the underneath of the section. 

3.  Keep on repeating these steps, don’t worry if it doesn’t look like a fishtail at first or if you feels like it’s taking a long time to come together, creating a fishtail plait can be very time consuming! 

4.  Once you have finished plaiting the entire hair, secure will a small elastic, try using one the same colour as your sitter’s hair or alternatively clear is fine.

5.  Remove the elastic at the top of you wish, you can also give the braid some texture by gently loosening the sides. Finally, set with hairspray!

The Hair Studio- Practical Week 3/4- French Plaiting


Another style we learnt in this week's practical was a french plait, this is a great and versatile style as it has never really gone out of fashion and is regularly on trend.

1.  Start off my brushing through the hair, making sure that any knots are removed.  Take a small section at the top of the head; making sure that it is clean and manageable so you have a good line to start off with.  Section this bit of hair into 3, making sure they are roughly all the same width, start off plaiting as you would normally, just once to make sure you have a strong base to start your French plait.  

2.  Once you have plaited your section once, place all strands in your left hand, keeping them all separated with your fingers. Then, gather a small even section of hair from the right side of the head, with your right hand and add it to the right strand.

3.  Bring the section that you have just added the hair to, over to the middle, and bring the middle strand to the right.  After you have introduced each section to the middle, don’t be afraid to give it a bit of a tight pull so that it stays nice and neat.

4.  Gather a section from the left side of the hair, and add this to the left strand. Again, bringing this section into the middle.  Always make sure that your hands are close to the head, so that the plait will always be tidy. 

5.  Follow these steps until there is no more available hair to add, finish your style with a basic plait. 

6.  To set the hair, you could use some hairspray.

Friday, 25 October 2013

The Hair Studio- Practical Week 2- Drying the Hair

After completing the first step of Washing and Conditioning the Hair, the next step is to blow dry the hair so that it is ready for any further styling.


1.   First of all make sure that your hair dryer is safe to use, and plug into the closest electrical socket.  Make sure that you place a nozzle on the end of the dryer; this will allow you to direct the heat where you want it effectively.


     2.  If your sitter has damaged hair, you may want to apply a serum or heat protectant, then go onto to brush the hair, making sure any knots or tangles are removed. Part the hair in the desired way, or where your sitter’s natural parting may be.

     3.  The next step is to roughly dry the hair, always making sure the back end of the hairdryer is kept away from the hair, as it can suck the hair in and cause a nasty accident.  Dry from the top of the   hair downwards, running your fingers through the hair to reduce drying time.

    4.  The next step in the drying process, is styling the hair more precisely using the hair dryer.  Here is when you section the hair into smaller sections. Once you have your small section, take a radial/round vent brush, taking a vent brush will allow the heat to circulate at the roots, creating volume. Starting at the top of the section of hair, place the brush at the root and apply heat over the top of the brush and underneath, this again gives the hair volume, keep the brush moving to avoid burning your sitter’s scalp. Keeping the hair round the brush, run the brush down the hair with the dryer, all the way to the ends.  Repeat this until your section of hair is dry; follow this process with each small section of hair until hair is completely dry.


5.  Once all the hair is dry, you can go over with the dryer on a cool setting to ensure they hair stays in the desired style, it will also close the hair cuticle which will add shine. You can also finish with a light-finishing product to smooth any fly aways. 

*Image Credit: Dryer vs. Air Dry - Blow Dry Hair or Air Dry Hair. 2013. (Online) Available at: http://www.myfashioncents.com/2013/beauty-finds/should-your-blow-dry-hair-or-air-dry-hair/.  Accessed 22 October 2013. 

Sunday, 20 October 2013

The Hair Studio- Practical Week 3- Creating and Styling a Bun

This week, after previously learning the basics of washing and blow drying the hair, we moved onto to creating buns and plaits.  This style of bun is creating without using any kind of hair tool, such as a donut, so looks a lot more natural and elegant. 


 1.  The first step to creating a bun is pulling all the hair back into a tight, neat ponytail.  Using a comb, or a brush will help you achieve the smoothness, but to ensure that the hair is extra neat, spilt the hair into two sections...pulling the top section into a ponytail first, then pull the bottom section up.  This way, you can focus on getting each section precisely how you want it, without too much hair to handle. 

2.  After this, split the hair in the ponytail into four equal sections.  Place each section into a pin curl, curling away from the head, secure it with a kirby grip. If the hair is thin, backcomb the hair lightly. 

3.  Once you've got each pin curl how you like, start pulling each pin curl round with a hair pin to create a smooth, round shape without any gaps.  Secure this lightly with the pins.


4. Finally the last step is to set the hair, set with a little hairspray if needed. 

My Journey with the Elizabethans- Creating 'Contemporary' Elizabethan Hairstyles

This week during our seminar, after researching and finding visual references and quotes about Elizabethan hairstyles that we like, we created these on paper using different materials and mediums, mainly focusing on a few words in the quote.  Some of the words in the quote I was given were 'shapes', 'tears', and 'frizzled.'


This is the style I created, I tried to use a lot of shapes and textures seeing as 'shapes' was one of the main words picked out from the quote.  To create the circular buns, I took some real hair and wrapped them in netting, this way it helped me get a clean and precise round shape, I also emphasised the shape of the head, and the high Elizabethan hairline by creating a plait at the front of the hairline, this again created a different shape and added to the 'frizzled' sense of style. As well as the plait,  I created shape and texture with the tight curls that fall down the side of the face. 

Tuesday, 15 October 2013

My Journey with the Elizabethans- Elizabethan Hair Inspiration


As we are now starting to think about what kind of contemporary hairstyles we might like to create in our practical sessions, I thought I would do some research to see if I could find any inspiration for what I would like to achieve, or generally just any Elizabethan themed hairstyles that caught my eye. 


Image Credit: Thumper- Elizabethan Research. The Ladies of 2.318. 2013. (Online) Available at: http://ladiesof2318.wordpress.com/2011/09/12/thumper-elizabethan-research/ . (Accessed 15 October 2013) 


The most prominent and interesting thing that stood out for me in this photo was the incorporation of the pearls throughout the hair, not only does it add a touch of elegance and class, but it also presents us with different textures.  It looks as if the pearls have been threaded through the curls, I feel there is just enough pearls throughout the hair, as if the whole head was covered the style of the hair in tight pin curls would not be recognised.   The heart shape of the hair is very common of the Elizabethan times,  and I really like the way the shape of the hair is outlined with lace, which creates a much softer feel as their hair often looked very harsh.  


Image Credit: Anne Neville, Queen of Richard the Third of England - Kings and Queens Photo (7141994) - Fanpop. 2013. (Online) Available at: http://www.fanpop.com/clubs/kings-and-queens/images/7141994/title/anne-neville-queen-richard-third-england-photo/15?show_2013=true . (Accessed 07 October 2013)


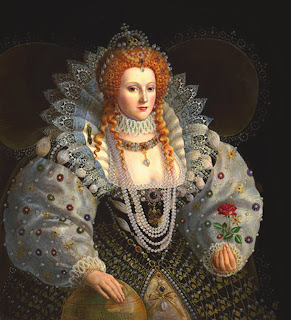
I actually analysed this on my Make Up blog also, but I just love the hairstyling particularly in this portrait of Elizabeth.  Just like my previous image, the shape of the hair is very much common of the era, the round, almost heart shape, but in this portrait there are strands of hair that fall down in ringlets.  This adds an unusual element, and again a softer feel to Elizabeth, I admire these kind of hairstyles that create a mellow look to her, as often I'm sure that would have been quite difficult to achieve as she was quite a stern looking lady anyway.  Again pearls have been incorporated but this time on her headpiece, pearls give a sense of purity, which she would have desired during the Elizabethan era, especially as she was known as the 'Virgin Mary'.  The headpiece is fairly simple, with only a handful of jewels, however I would imagine that with such statement red hair anyway, less would have been more when adding a headpiece.


Sunday, 13 October 2013

My Journey with The Elizabethans- Pony's, Plaits and Buns!


The Hair Studio- Hair Practical Week 1- Washing and Conditioning Hair

In our first practical hair lesson, we were taught how to correctly wash and condition someones hair, this is usually the first step in any hair styling process.


1. Before even starting to think about washing the hair, we were taught to check for any contra-indications, this includes things like eczema, psoriasis, head lice etc.  Once you have established that there are no contra-indications, place a cape round your model/client and take them to the basin.


2. Once at the basin, place a towel over their shoulders, this stops any water dripping down their back.  Ask them then to place their head back into the basin, making sure they are always comfortable,  turn on the water and always make sure you check the temperature before you wet their hair.  It has been recommended that the best place to check the water temperature is your wrist.

3. Wet your model or clients hair, asking them regularly if the water temperature is still okay, ensure that all the hair has been covered and you are not letting water run down their face or get into their ears.  Take a small amount of shampoo in both hands and massage through the hair, making sure it is foaming up nicely.  If the shampoo doesn't seem to be foaming especially well, try adding a little bit of water before adding more shampoo.  Once the hair has foamed up well, rinse the shampoo off.  You may then want to shampoo their hair once more, following the same process.  You will know if the hair is clean, as it will start to make a slight squeaking noise.

4. The next step and final step is conditioning,  take a small amount of conditioner in the hands and focus on apply it to the mid lengths and ends.  Massage the conditioner through the hair, don't be afraid to press a little harder than usual when massaging the head, if you are unsure if the pressure is okay, ask your client.  After this, take a wide toothed comb and brush through the hair, making sure the hair is tangle and knot free, finally wash the conditioner out the hair, it is vital that ALL the conditioner is out before you start any kind styling process.

Saturday, 12 October 2013

Elizabethan Hair Quotes...


“What should I do with him—dress him in my apparel and make him my waiting gentlewoman? He that hath a beard is more than a youth, and he that hath no beard is less than a man; and he that is more than a youth is not for me, and he that is less than a man, I am not for him.”

William Shakespeare, 1623.


- This quote, taken from Shakespeare’s ‘Much Ado About Nothing”, explains how the character Beatrice is failing in her search for the perfect man, because no one will quite live up to her expectations.  In the quote she says how men who possess no facial hair are not manly enough for her, whereas those who do possess facial hair, particularly beards, are not youthful enough for her.  In the Elizabethan times, it was said that men who possessed a little facial hair, maybe a moustache, but not a fully-grown beard were very sexually desired.  So a man that was between the stages of youth and adulthood was a sexual ideal at the time. In fact, the beardless adolescent attracted both men and woman during the Elizabethan stage.  


"Then followeth the trimming and tricking of their beds in laying out their hair to the show, which of force must be curled, frizzled and crisped, laid out on wreathes & borders from one eare to an other. And lest it should fall down, it is underpropped with forks, wyres, & I can not tel what, rather like grim stern monsters, that chaste christian matrones.  Then on the edges of their bolstered heir (for it standeth crested round about their frontiers, & hanging over their faces like pen dices or fails with glasse windows on every side) there is lady great wreathes of gold and silver, curiously wrought & cunningly applied to the temples of their heads.  And for feare of lacking any thing to set foorth their pride withal, at their heyre, thus wreathed and crested, are hanged bugles, ouches, rings, gold, silver, glasses, & such other gewgaws and trinkets besides, which, for that they be innumerable, and I unskilfull in wemens terms, I cannot easily recount."

Philip Stubbes, 1583.

Here are some images/objects that come to mind when I read this quote:


Tuesday, 8 October 2013

Hair Descriptions- My First Project...Red Heads and Royalty!

My First Hair Design Project is called 'Red Heads and Royalty, 'Red Heads and Royalty' goes along side my 'New Elizabethan' Make Up brief.  For this project I will be collecting historical research and technical observations of the hairstyles used in the 16th and 17th centuries.

Our first task to complete after our seminar was to find two images of hairstyles that represented the words we got given in class, my words were 'Smart' and 'Wild'.


Smart


In my opinion, I find this hairstyle to be very smart.  The hairstyle is sleek, and the finish is extremely polished.  The soft curls that look to have been softly pinned back against Kate Winslet’s face portray a very elegant style, and a look that isn’t messy.  I also think the bobbed style adds to the whole sophisticated look. 
Another factor that I noticed was the side parting, often used in previous era’s, to create a chic and refined style, is replicated within this hairstyle. This helps to create a soft focus around her face.  

Wild


This look completely contrasts to my previous chosen image.  To me, this hairstyle is definitely wild.  The use of different materials and textures to create this look evoke an edgy feel, the headpiece is created using quite stark colours, which is very different to the softness of my previous chosen style. The hair underneath the headpiece has been tightly pulled back, and a white paint has been used to change the hair colour, this is quite harsh, but shows that the stylist is not afraid of experimenting with lots of different mediums.